Visas are often one of the most common travel headaches... but if you're planning your trip to Indiayou're lucky because in this guide you have all the information you need about visa for India and step-by-step instructions so you can easily apply for your e-visa online from home.
General visa information for India
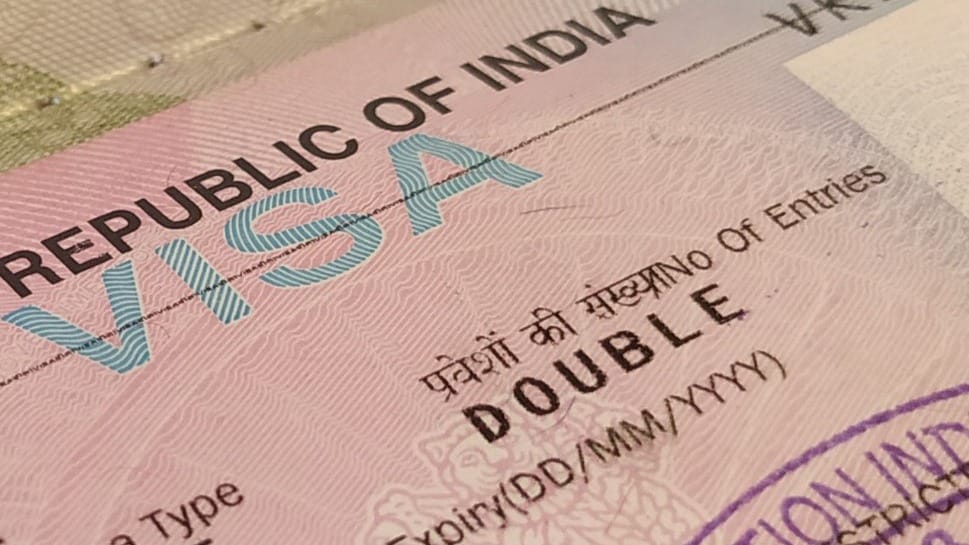
What is the visa for India?
The visa to travel to India is the document that allows you to enter the country legally.
Do I need a visa to travel to India?
Yes, to enter India you need a visa and a passport valid for at least 6 months.
Types of visas for India
There are 13 types of visas to go to India depending on the intention of the trip: tourist visa, business visa, medical visa, work visa, student visa, etc. There are two ways to obtain the visa on your own:
- e-Tourist Visa or e-Visa for India: the electronic visa is processed 100% online (the website and the whole process is available in English only).
- General visa for India: You can apply online or in person, but you will have to bring or send your passport to one of the offices designated by the embassy to obtain the visa.
If you prefer to have it processed by an agency and avoid headaches, I recommend that you process it with iVisa. They have customer service 24 hours a day and you can do the whole application process in several languages.
Requirements to apply for your visa to India
- Your passport must be valid for at least 6 months. at the time of applying for the visa and must be in possession of 2 blank pages.
- Flight out of the country. This requirement is a matter of debate since most of the time they don't ask for it but...they can always do it.
- You can only enter the country through the airports and/or ports determined for the e-Tourist Visa.
E-tourist Visa or E-Visa India
The electronic visa, or E-Visa, is a document that 100 % is processed online and presenting it together with your passport you have permission to enter India, in this case as a tourist.
Types and prices of e-visas for India
For your trip you will need a tourist visa and there are 3 modalities depending on the duration:
| DURATION | INFORMATION | PRICE |
| 30 days | It has double entries and cannot be extended | 10$ (April to June) 25$ (July to March) |
| 1 year | It has multiple entries and allows you to enter India for the 365 days that your visa lasts but you can only stay for a maximum of 90 consecutive days at each entry. Japan, United Kingdom and United States have a maximum of 180 days on each entry. | 40$ |
| 5 years | It has multiple entries and allows you to enter India for the 5 years that your visa lasts but like the one-year visa, you can only stay for a maximum of 90 days at a time on each entry and some countries enjoy 180 days. | 80$ |
These are the prices for travelers with Spanish nationality and do not include the fees for card payment. For the rest of the countries, here you have the complete list of prices according to nationality and visa duration.
Airports and seaports of entry to India with E-Tourist Visa
Here is the list of airports and seaports through which you can enter the country with the E-tourist Visa. Airports: Ahmedabad, Amritsar, Bagdogra, Bengaluru, Bhubaneswar, Calicut, Chennai, Chandigarh, Cochin, Coimbatore, Delhi, Gaya, Goa, Guwahati, Hyderabad, Jaipur, Kolkata, Lucknow, Madurai, Mangalore, Mumbai, Nagpur, Port Blair, Pune, Tiruchirapalli, Thiruvananthapuram, Trichy Trivandrum, Varanasi and Vishakhapatnam. Seaports: Cochin, Goa, New Mangalore, Mumbai, Chennai.
Fraud from unofficial visa websites
It is very important that if you apply for a visa to India online, just do it from the official government of India website. There are several unofficial websites of dubious credibility that are misleading. On the other hand there are also quite a few websites that process the visa legally but charge you a very high price unnecessarily. I think you may be interested in reading the article on the most popular scams in India and my advice on how to avoid them.
Official website to apply for the E-Visa to India.
Apply for your e-visa only through the official website of the government of India.
When should I process my e-visa for India?
The 30-day visa, you can apply for it between 4 and 30 days before your departure date from your country of origin. I recommend you not to leave it to the last minute and apply more in advance than the minimum 4 days in case there are any problems on the web or with the processing of your visa. For 1 and 5 year visas, you can apply between 4 and 120 days before your departure date from your home country.
For one-month visas, the duration of the visa starts on the date of entry into the country. On the other hand, for 1 and 5 year visas, the duration of the visa begins on the date the visa is granted.
India Travel Guide
The most complete guide to organize your trip to India, with tips and resources to save time and money.
How to apply for the E-Tourist Visa or E-Visa for India online
Now I will guide you step by step through the online application form for your visa to India. I will only comment the most relevant of each section and what may generate doubts, since much of the information requested is basic and you will not need help with it. I share an image of each screen you will find during your application and the steps to follow.
SCREEN 1

Enter the official website in this link and click on the button "Apply here for E-VISA"at the bottom left.
SCREEN 2
Fill in the general information: Passport Type: choose ORDINARY Port Of Arrival: indicates the airport you are arriving at in India Expected Date of Arrival: the date of entry into India, i.e. the day your flight arrives Visa Service: you must select the E-tourist Visa and select the activities that you are going to carry out during your trip. If your intention is only sightseeing select RECREATION/SIGHTSEEN. Select the check box "I have read the instructions, I have all the required documents...".
Click on the button CONTINUE You will get a pop-up window to notify you of the documents you need for the application:
- Passport photo of at least 350×350px with a weight of less than 1MB
- A scanned copy of the page of your passport where your personal information appears, in PDF and with a maximum weight of 300KB.
SCREEN 3

Fill in your personal and passport information. At the top you will see your temporary Application ID. Copy it as you will need it if you leave the site and have to log back in to finish your application and also to make payment or track your visa status. On this screen you have two sections:
- Applicant Details: here you must fill in your personal data
The first and last name you enter must match 100% with the information in your passport (THIS IS VERY IMPORTANT) The "Citizenship/National ID" is your DNI or ID card number (not your passport number) When asked if you have visible birthmarks just check YES if it is something very conspicuous or obvious.
- Passport Details: here you must fill in the passport details.
When you have everything filled in, click on "SAVE AND CONTINUE". If you want to exit and continue with your application at a later time click on "SAVE AND TEMPORARILY EXIT" and when you are ready to log in again you will need your tracking ID.
SCREEN 4

Fill in your residence and family information. On this screen you have three sections:
- The address where you reside in your country
If your permanent address is the same, select the check box and it will not be necessary to fill in this section.
- Information about your parents
It asks for your parents' names, nationality, date and place of birth.
- Your marital status
In the last section you are asked if your parents/grandparents are from Pakistan. In most cases the answer will be NO, but otherwise you should put YES and fill in the details it asks for. Again, when you have filled in all the details click on "SAVE AND CONTINUE".
SCREEN 5

This screen asks you for information about your trip to India and consists of 5 sections:
- Details of the requested visa: here you must indicate the places you will visit. If it is a very extensive tour you can indicate the main places (for this you have two lines). You should also indicate if you have hotels booked through an agency or tour operator and the location where you will leave the country (airport or port of departure).
- Information on previous visas and current valid visas: Here you have to indicate your previous visa information if you have ever been to India. If you do not have this information, it is best to answer NO to the question if you have been to India before. This way you will not have to fill in this section.
- Other information: write down the countries you have visited in the last 10 years
- Detail of visits to SAARC countries: indicate if you have been in any SAARC country in the last 3 years (Afghanistan, Bangladesh, Bhutan, India, Maldives, Nepal, Pakistan and Sri Lanka).
- References: here you must indicate the address and telephone number of the hotel where you will be staying (the first hotel of your tour, if you will be in several). And you will also have to write the contact information of a person in your country.
Again click on "SAVE AND CONTINUE".
SCREEN 6

In this section you will be asked security questions such as if you have been arrested, if you have been deported from any country, etc. If you answer YES, you will have to give details. For most travelers the answer to these questions will be NO. Check the box to accept the declaration and click on "SAVE AND CONTINUE".
SCREEN 7

In this screen you must upload your photo. Remember that it must have a white background, be in JPEG format and be at least 350×350px and less than 1MB in size. Once you have selected the photo, click on the button "UPLOAD PHOTO" and it will take you to the next screen.
SCREEN 8

In this screen you must upload a copy of the main page of your passport. This document must be in PDF format and have a maximum weight of 300KB. Once you have selected the PDF, click on the button "UPLOAD DOCUMENT"checkbox, accept the checkbox and click on "CONFIRM" and it will take you to the final screen.
SCREEN 9

In this section you will have the form with the information you have inserted and you must check it thoroughly. If everything is correct click on "VERIFIED AND CONTINUE". If you need to make any changes click on "MODIFY". It is very important that you review all the information because once paid, the cost of the visa is non-refundable, even if you are denied.
SCREEN 10

This screen provides information on visa payment:
- If you make 3 unsuccessful payment attempts, you will have to apply again (start from step 1).
- You have the option to pay now or pay later. If you choose to pay later, you will need your application ID to do so.
- The payment can be made before 4 days before the beginning of the trip (I recommend you not to hurry so much, in case there is any problem with the application).
- You are instructed to bring a printout of the ETA (Electronic Travel Authorization).
If you want to pay now click on "PAY NOW" and you will be redirected to the payment gateway. Here you will have 3 options: Paypal, SBI e-pay and Axis Bank. Once you choose the gateway, insert your card details and make the payment. When the payment is done you can download the receipt and you will receive an email with the confirmation of the visa payment. At this point, you have to wait for the email with the confirmation that your e-tourist visa has been approved (Granted). When you receive the email, go back to the website and print your ETA, which you will have to present together with your passport when you leave your country and when you enter India.
E-visa for India processed by iVisa agency
In the official website of visas to India all the application must be done in English. If you do not feel comfortable with this, have doubts or fear to make a mistake, even if your problem is the lack of time you can request that iVisa. The agency iVisa is totally trustworthy and they have a very good service with assistance 24 hours a day and 7 days a week. The price for them to process your visa to India is 26.5€. You can see all the details directly in their web.
How to apply for the e-Tourist Visa to India with iVisa
You can process your application on the iVisa website.. If you have any doubts during the application process, I recommend his article "Form to process visa to India", where they will most likely respond to them and if not, you can contact them directly.
General visa with Vfsglobal
The Embassy of India has VFS global as an external company to process their visas, so you will not have to visit the embassy to do the process. However you should know that to obtain the visa in general you have to provide your passport in a physical way in one of the offices of VSFglobal in Madrid, Barcelona or Las Palmas. If you do not want to or cannot visit the office you can have your passport sent by mail (this will cost about 25€).
Transit visa to India
This visa is for those who make a stopover in India and want to take the opportunity to leave the airport and make a visit with a maximum of 72 hours. This type of visa cannot be applied for online and must be processed directly with VSFglobal. For more information you can visit the website of VSFglobal.
Special permits for access to restricted areas
In India there are several areas with restricted access, so if you want to visit them you will need a special permit in addition to your visa. Currently these areas are:
- The Northeastern states of India: Arunachal Pradesh, Nagaland, Manipur, Mizoram and Sikkim.
- Parts of Uttarakhand, Jammu, Kashmir, Rajasthan and Himanchal Pradesh.
- Andaman and Nicobar Islands.
5 % DISCOUNT on Heymondo Insurance
To travel to India or any other destination (and at any date)
The Immigration Office of the Ministry of Home Affairs is in charge of issuing permits to these areas. Permits are usually for 10 days but they can request an extension of 7 more days. Keep in mind that if you travel with an organized tour they are in charge of requesting it or they will help you to do it.
I hope this article will help you to apply for your visa to India and answer the most common doubts about this topic. If you are fluent in English, go ahead and apply for your visa on your own on the official website. If on the other hand you are afraid of not filling out the form correctly, you do not have time or you prefer to process your visa in Spanish, then do not hesitate to apply through this link on the agency's web site iVisa.
You are getting closer and closer to India. Enjoy your trip!
This article is for information and guidance purposes only. We recommend that you always check the official information on the corresponding website for updated and accurate details. We are not responsible for errors, omissions or possible discrepancies with official sources. Consult with experts or competent authorities if you have specific questions.
Leave a Reply